
Great tools are easy to use; and when you get one, you want to play with it right away. But to get the most out of anything in BIM-land, stakeholder consultation and project guidelines are critical. Whether you're an owner, engineer or GC, this practical article will help you structure your BIM Track project for optimal management and collaboration.
We’re going to help you figure out what you’re dealing with on your project, establish the “project playbook” & get properly set up in BIM Track.
1. What’s in this project, anyway?
If you haven’t already sat down and discussed what’s what and who’s who on your project’s coordination, we highly recommend a BIM coordination kickoff meeting. This is to clearly establish the project’s scope, assets & more. It can look something like this:
BIM COORDINATION KICKOFF MEETING AGENDA
- Existing model availability
- File formats to use for coordination
- Software used by different stakeholders
- Origin & orientation in tools
- Frequency of coordination meetings
- Tea / coffee / beer / tequila break depending on how well that went.
Next, as a group, you will have to decide what rules work best on this project for each of the steps below. Once you have decided what these rules are, you’re going to want to incorporate them into your BIM Execution Plan (BxP / BEP).
“My project doesn’t have a BIM Execution plan”.
It’ll make your life a heck of a lot easier if it does, but that’s a whole other article. Penn State has some great resources to get you started. You can also ask peers if they have one you can leverage. Basically, think of your BIM Execution Plan as your project playbook.
2. Decisions, decisions, decisions
As a project team, the main contacts and rules for communication need to be decided.
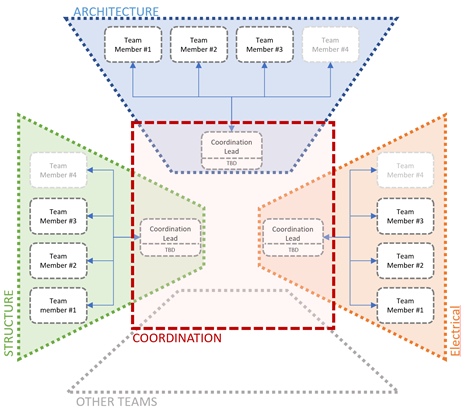
Making a communication diagram between the different stakeholders can be helpful. Everyone should know who they need to go to for every type of question on the project. Teams should also be created, usually based on discipline / responsibility.
Here’s an example below, where all team members have access to BIM Track for internal issue resolution. However, you have a “go-to” for each team who is responsible for leading coordination, as well as assigning issues to external teams. Generally this is someone with strong construction experience (not necessarily a “BIM guy / gal”). These coordination leads work together to solve any issues and have the authority to act as decision makers for each team.
3. You got 99 issues, but sorting through them ain’t one.
Next up, we need to define your project’s issue attributes. Basically, it's a series of parameters that lets you filter through the hundreds of issues on your project. It is going to save you a lot of time.
You’ll want to predefine with the project team:
- Zones: Generally these zones are configured by floor, area or function, and you can customize to your project.
- Phases: You may want to use construction sequences for very large projects. This could also be general project phases (schematic design, construction documentation, construction, handover etc.) or it can be delivery phases (A, B etc.).
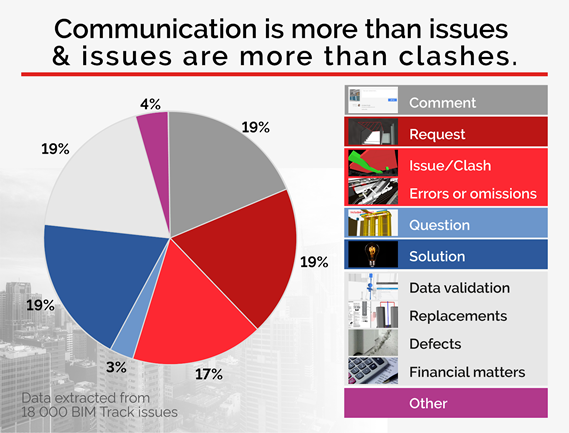
- Types: This has to do with the type of comment your are making. Examples could be comments, requests, questions, etc. Don’t forget: communications are more than just issues and issues are more than just clashes!
- Priorities:
We highly recommend a clear table that outlines priorities by timeframe for answers. For example:
| Priority | Severity | SLA for resolution |
| Critical | Puts the project at risk | Ideally in 1 day (with meeting if req’d). |
| High | Major impact on the feasibility | Ideally in 1 - 3 days. |
| Medium | Moderate impact | Ideally in 3-7 days. |
| Low | Weak impact | Ideally in 7-14 days. |
Status:
- This attribute is to sort by project status. Please note you can restrict the access to certain status by teams ex: you can set it so that only the QA/QC team can close and issue.. Here are some examples of a project status:
| Status | Anticipated use | Actions |
| Open | Issue created | Assign a person responsible. |
| In-progress | The assigned person uses this to signify they are aware and are working on a solution. | |
| Closed | The issue / question is resolved. | The person responsible closes the issue or question when they deem it resolved. The initial author of the issue / question should follow up to make sure their issue / question was satisfactorily resolved. |
| Re-opened | If a previously resolved question needs to be reopened. | Re-assign a responsible person. Does not need to be same person as it was originally if the questions pertains to someone else. |
Color by attribute:
- You can also assign the colour coding of an issue within BIM Track based on one attribute. This could be zones, phases, status, types or priorities. What is used as the main color by attribute should be decided before the project starts. You can find this feature under Project settings, default issue color attribute property.
4. Can I create my project yet?!

Yes!! You’ve done the heavy lifting of figuring out what assets you have, who is on the teams and how they will work together.
Setting up your project
Simply open up your BIM Track web platform, navigate to the project tab on the left-hand side, then click “Add project” at the top-right.
Setting up your team
Users are managed from two places: the hub and individual projects.
The hub is mostly administrative, controlling what users have access to what projects and billing. If you are a Hub Admin and want to add a new user, you can find this under Hub settings. Here are the different kinds of access rights in BIM Track:
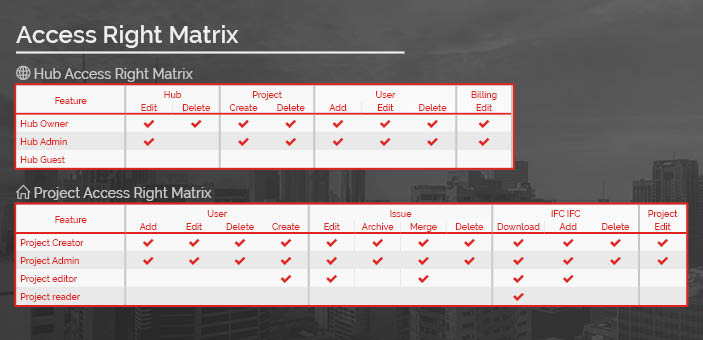
At a project level, you can further manage users (under the aptly named “Manage users” section!) by assigning them to teams.You can also create rights & restrictions by teams as needed. Each individual can manage the frequency and type of their notifications for a style of organization that works best for them. Learn how to manage users in our Help Centre.
5. Where am I in my model?
If people get lost in your BIM Track project and its’ associated models, guess who they are going to ask for directions? It’s you. It’s always you.

Make sure your project coordinates (or origins) are set up properly to begin with and avoid that hassle.
Any building information model should ideally be aligned with the previous model’s coordinates. This is extremely important, particularly for reviewing multiple models at once from different stakeholders in BIM Track’s web viewer.
- Learn how to set up shared coordinates in Navisworks & Revit.
- Learn how to set up shared coordinates in Tekla Structures.
6. Importing models into BIM Track
If you’re not using Revit, Navisworks, and/or Tekla Structures, you can use BIM Track’s online platform. As the models change though, it is important to regularly update the online model by uploading your IFC files.
Each discipline’s models should be exported as separate models for clear scope definition. If the model is big in terms of file size (more than 500MB), it may be better to also upload separate models by buildings, disciplines, zones or phases of the project.
- Convert Revit models to IFC for reference in BIM Track.
- Convert Tekla Structures models to IFC for reference in BIM Track.
Please note that coming this year, you will be able to publish a model to BIM Track from Revit to make this process even easier.
A note on Revit & Navisworks interoperability
While Revit and Navisworks play fairly well together, you will need to make sure a few options are selected to make sure that your element ID is consistent.
7. Tackle better BIM Coordination - together!
 There you have it: all you need to know to set up your first project successfully in BIM Track. While it may take a little more time up front to set your project up well, doing so will avoid a lot of headaches in the long run. As my father-in-law likes to say: “Proper planning prevents poor performance”.
If you have any questions whatsoever during your project’s set up phase (or anytime!), you can check out our resources in our help center. We’re also always ready to help directly in the “chat” portion of the platform. Good luck in your first project & may the BIM force be with you.
Whether you're an owner, engineer or GC, this practical article will help you structure your BIM Track project for optimal management and collaboration.
- Alexine Gordon-Stewart