
Working in Revit with someone else’s project and families is like a box of chocolates. You never know what you’re going to get. You’re clicking on objects you haven’t created, hoping to see the parameter values you’ve been needing but only to find the level and offset constraints….
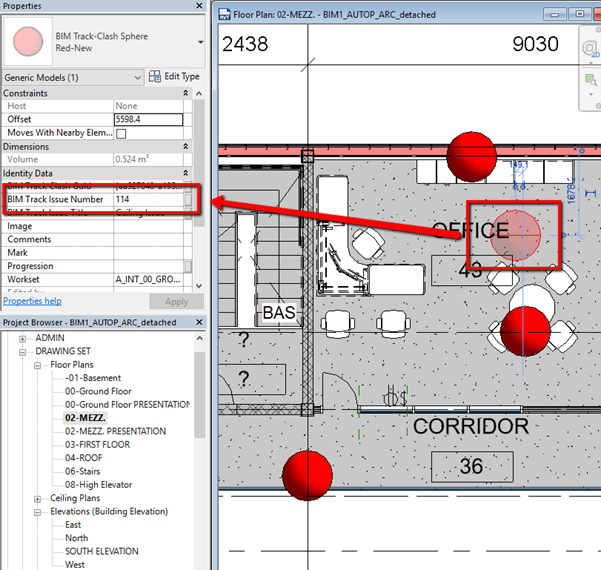
When we were recently asked if we could display the issue number in a clash sphere while working in a plan view, we knew what was waiting for us. We grabbed the nearest clash sphere and sure enough, in the Identity Data parameters, there was the BIM Track Issue Number:
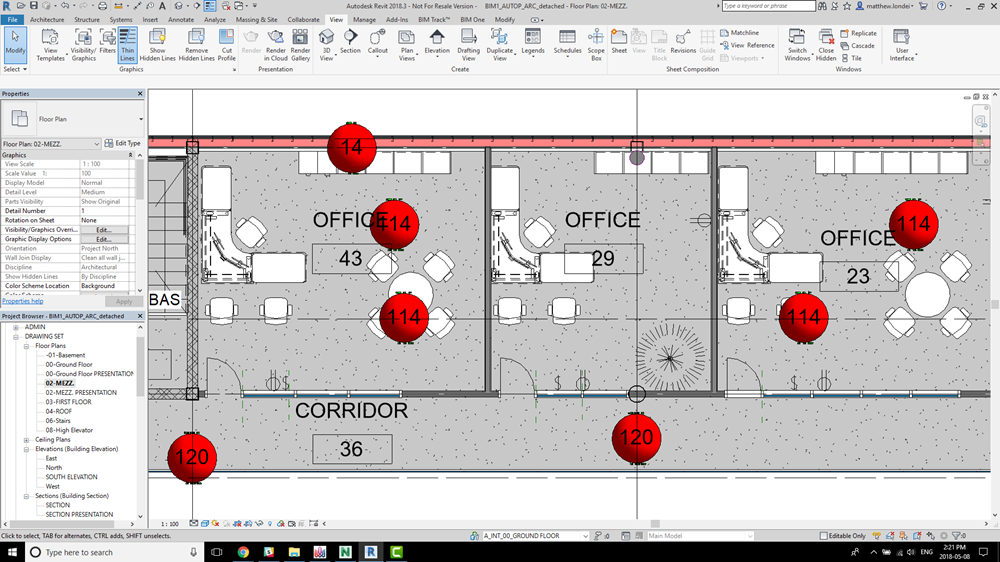
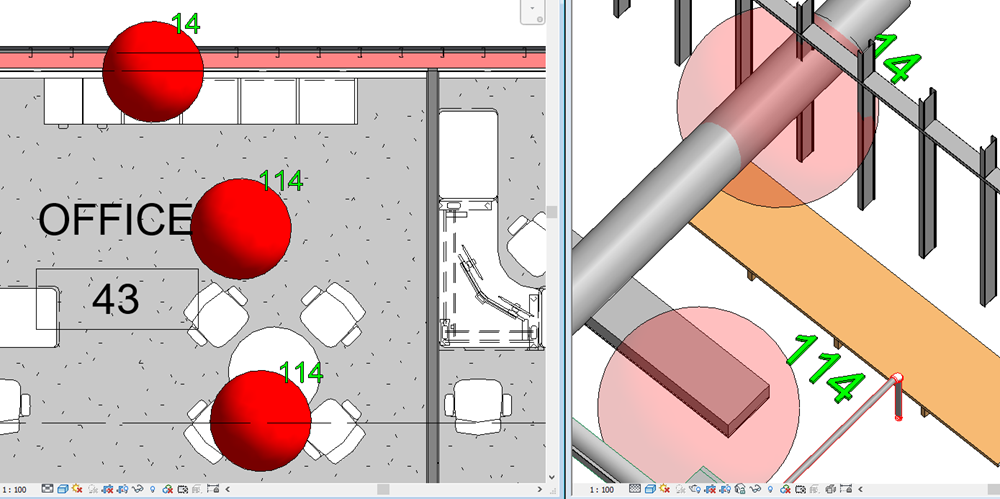
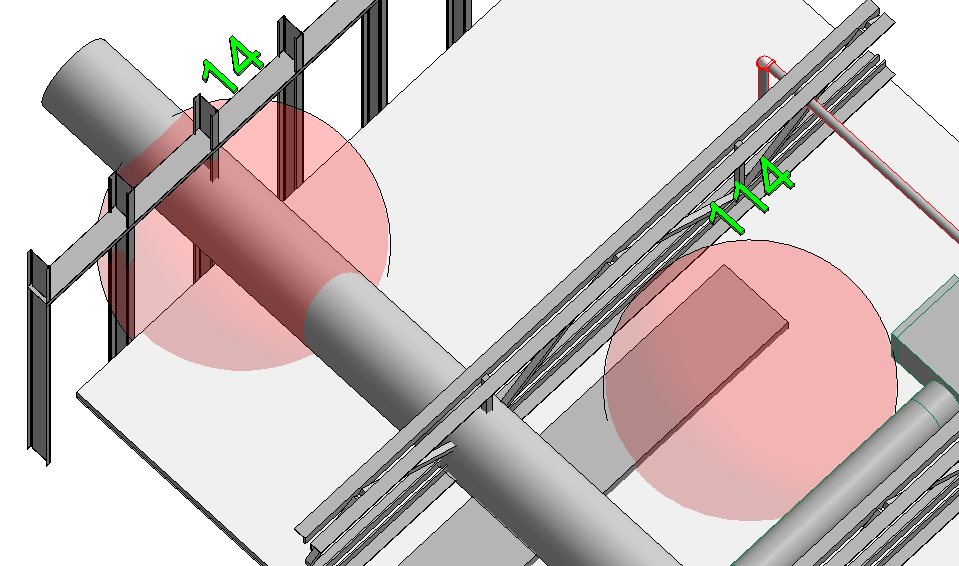
In a few minutes, we had the issue numbers visible in plan and in 3D for overall visual interpretation of our project issues. We could now quickly determine what clash spheres belonged to the same group; a nice bonus for coordination meetings.
How can I add visible issue numbers to my clash spheres?
All you needed to do is extract that parameter number for display. Below we will cover how you can do this. It’s a few steps, however once it’s done, it can be saved and reused on other projects.
Strapped for time or feel this might be too far out of your comfort zone?
Download our Revit 2018 clash sphere family
Please note: There are 2 options for creating this family. We recommend reading the whole article before picking the one that’s right for you.
Option A - Label Annotations
Only need to see your issue numbers in a plan view? Use the label annotation approach. You can place the issue number right in the middle of your clash sphere and not worry about it being hidden. If you’d like to DIY and see the why, and how, here’s how we did it. You can also follow along with the video:
1. Grab any clash sphere and click Edit Family.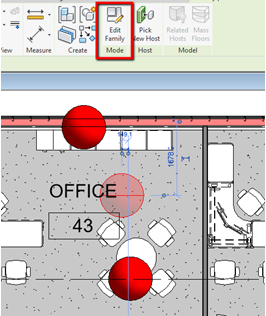
2. Open the Ref. Level plan view.
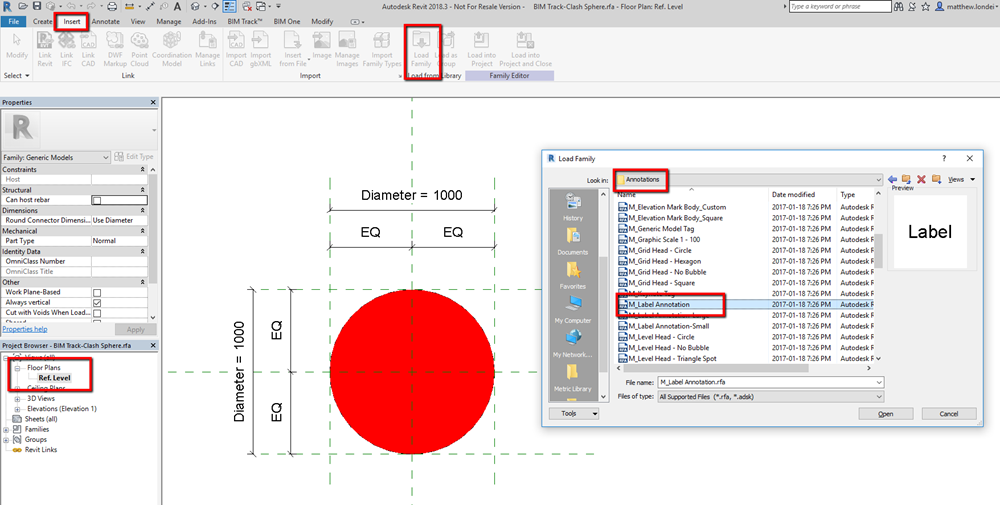
3. Click the Load Family command from the Insert tab.
4. Open the Annotations folder.
5. Load in the Label Annotation (We’re working in metric. That’s why we have the M_ prefix)
6. From the Annotate tab select Symbol and place the label we just loaded anywhere in the view. We’ll center it later. It will appear as a question mark (?).
7. From the Family Types dialog box expand Identity Data. Give the parameter BIM Track Issue Number (default) a value. We’ve used Issue #. Click OK.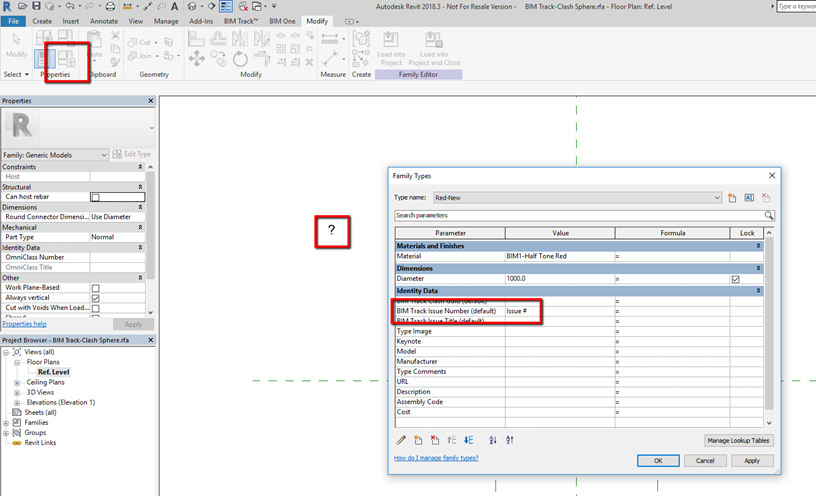
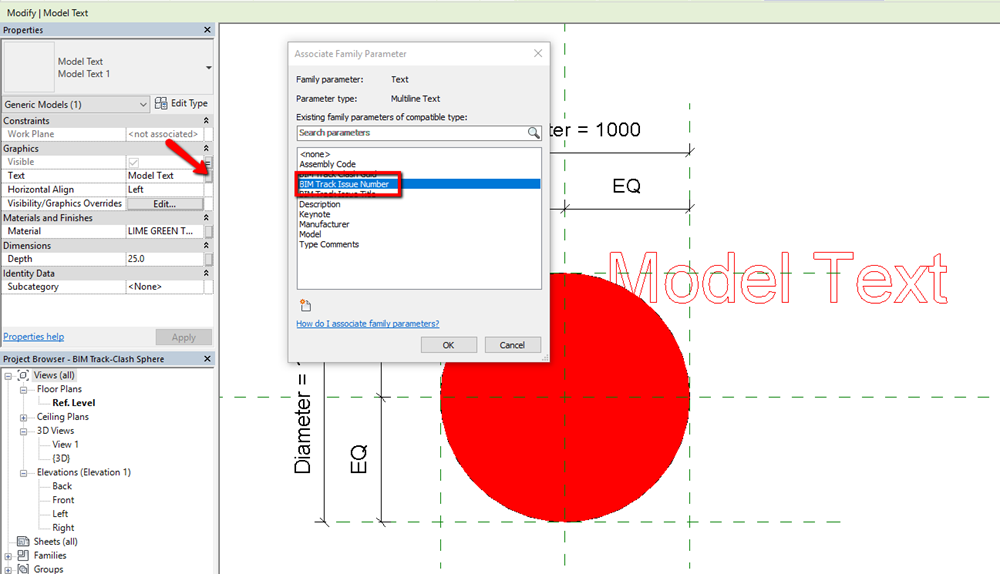
8. Select the Label Annotation (?), click Edit Type, at the end of the Label parameter click the Associate Family Parameter button. It’s the very small grey button.
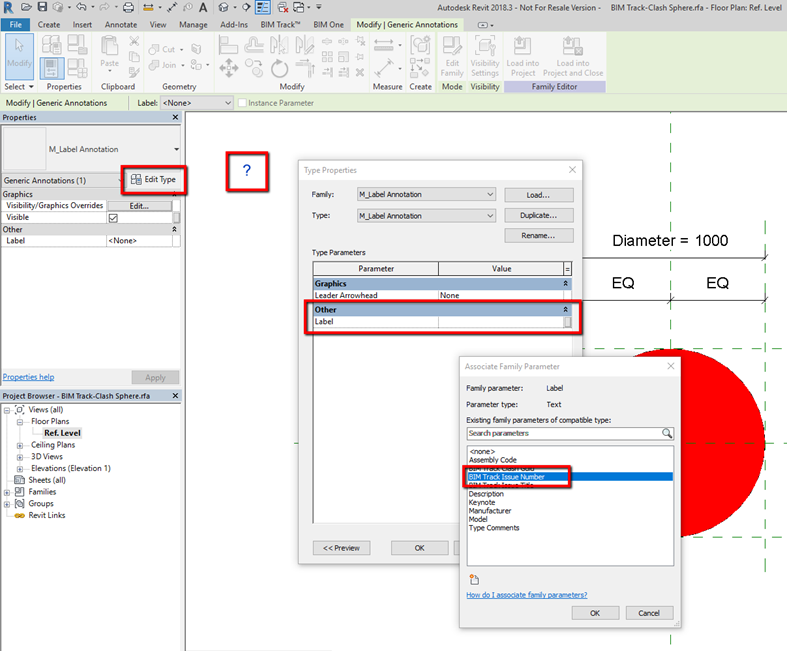
9. From the Associate Family Parameter dialog box that appears, select BIM Track Issue Number. Click OK.
10. The Label value will now read whatever value you gave the parameter above. Click OK.
11. The question mark will be renamed according to the parameter value. Relocate the label to the center of the clash sphere.

You’re done! You’ll now see the issue number in the middle of the clash sphere in a plan view once loaded back into your Revit project.
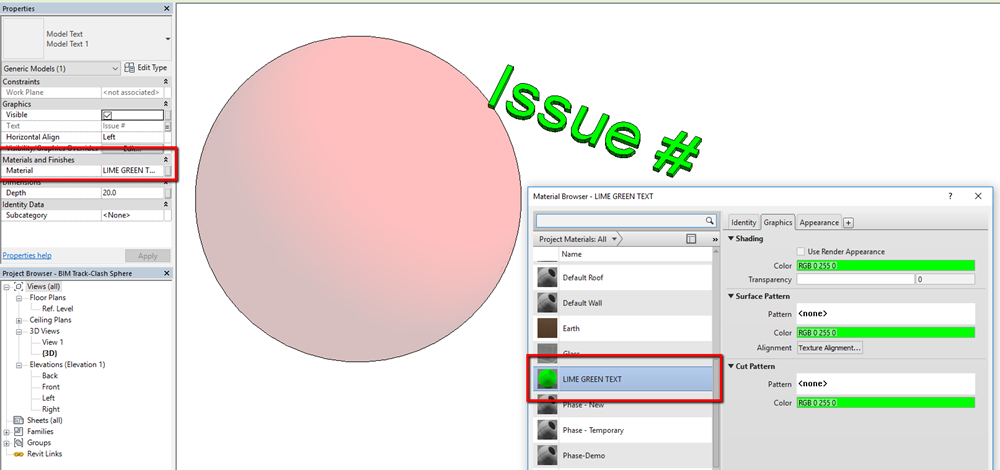
Option B - 3D Model Text
Want to see those issue numbers in 3D environments? Follow these steps:
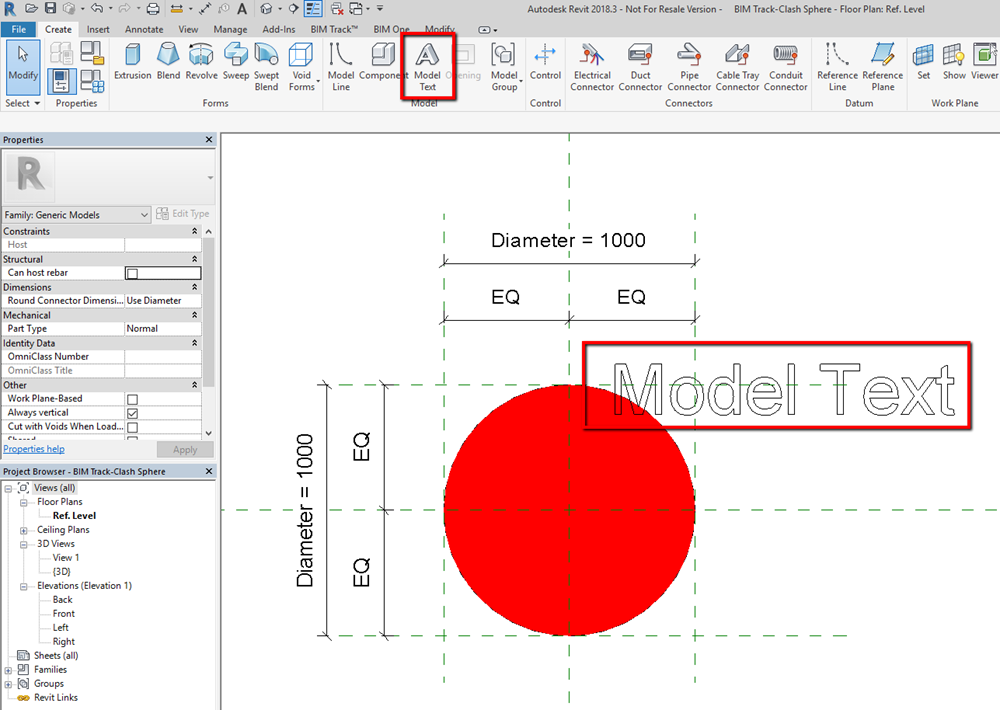
1. In the Ref. Level view, open the Create tab, click Model Text, rename it if you’d like, and place it in the top right corner.
2. From the Associate Family Parameter dialog box select BIM Track Issue Number. Make sure you’ve given the parameter a value as we did in Step 7 above.
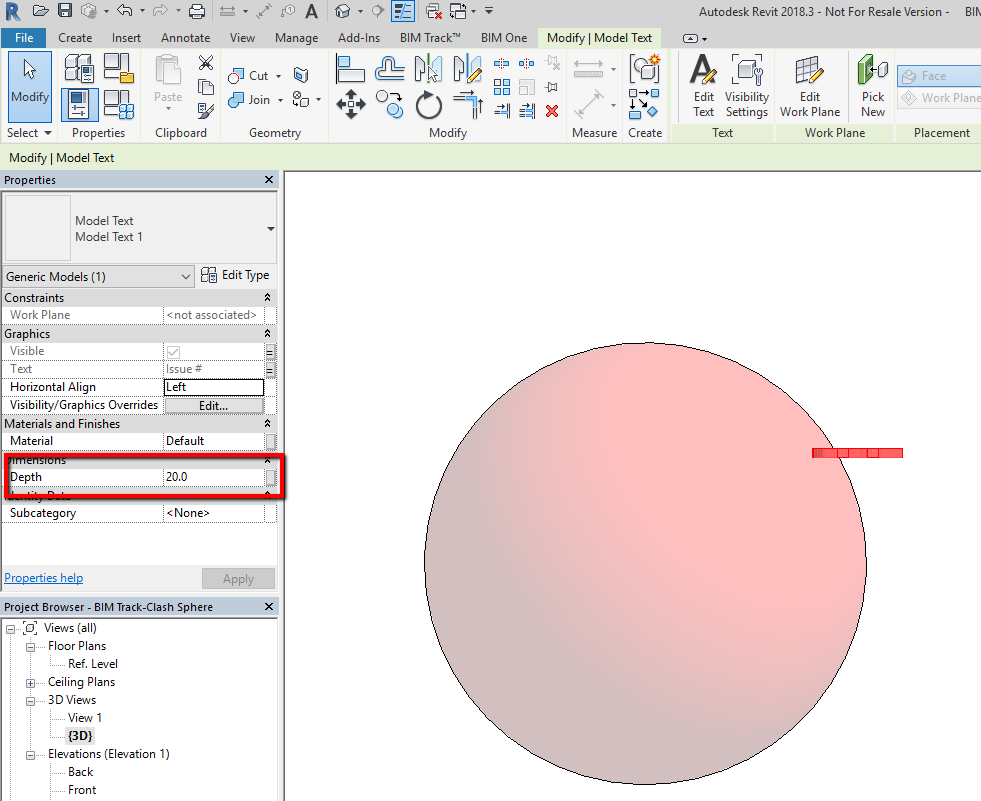
3. Switch to a 3D view, and lower the depth of the text. You may also want to lower the entire model text.
4. Orbit around the clash sphere and model text to assure that no parts of the text are inside the sphere. Make any modifications you may need. You can always come back into the family to make any adjustments.
Getting the family into your project
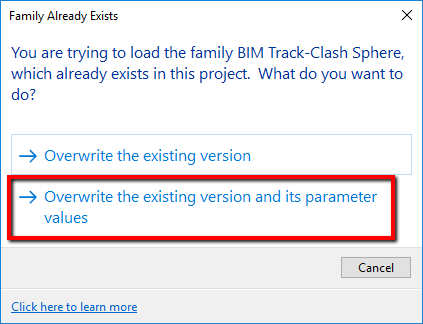
We’ve successfully added the labels to our clash sphere family, regardless of the method we’ve gone with. Now we just need to load it into our project. Click the Load into Project button in the Modify tab. Since we opened this family directly from an existing project we’ll need to overwrite the family and its’ parameter values.
Your clash sphere will now display the BIM Track issue number!
A few things to remember
Here are a few things to keep in mind:
1. This modified family only exists in this project. To use it again in another project, save it on your computer. Once you’ve performed the Show clash sphere command in BIM Track, you can open the family with the label annotations and load it into the project. Remember to overwrite those parameter values!
2. Feel free to place the 3D text on multiple sides of your clash sphere. Sometimes elements may get in the way and it’s beneficial to have the text displayed on multiple sides.
3. Pick from the two options above wisely! Option A will only show in a plan view as it is a label annotation. Option B can show in both 3D views and plan views but if the 3D text is inside the clash sphere it won’t be visible in plan. That’s why we leave it off to the side.
4. You can splash in some color to make the text easier to see:
We hope this helps you manage your clash spheres at a glance. As we said before, don’t hesitate to download a Revit 2018 version of this family right here.
If you have any questions about how you can get the most out of BIM Track, please do not hesitate to reach out to me directly.