
A good chunk of BIM Track’s power is based on properly filling out issue attributes, which can be customized per project in the project settings. We’re going to take a deep dive into issue attribute best practices for optimal BIM Track project and team management.
The most important thing to keep in mind while you are setting and assigning these issue parameters is that this is how you will filter issues for coordination reports, check your project is on track, and more. Think of what you will need to sort these by and you will set up the right parameters 👍.
Here are each of the issue attributes (as shown in our web platform):

We’re going to start with the attributes that prompt our most FAQs:
Managing Collaborators
 Assigned to is the person that needs to resolve the issue. In BIM Track, we allow users to add one individual’s name. This generates an email that gets sent to the user, albeit within their user notification parameters (immediately, weekly, daily). Only one person can be selected to avoid lack of accountability / lack of action / confusion.
 Team involved allows you to assign issues to a team when you’re not sure which specific person needs to take action. NB: This attribute can be renamed “Ball in court” or “Team responsible.”

Visibility allows you to restrict the visibility to the author, the assignee, the team(s) in the 'Team involved' field, and the notified users/teams. Sometimes issues need a higher degree of privacy, or you might not want everyone to see the issue.
 Notify is the BIM Track equivalent of cc’ing someone in an email. They will be notified of all changes. Teams or individuals who have access to the issue can be selected under the Notify column. NB: This attribute also be renamed to “Follower” or “Watcher.”
How critical is it?
 Priority is set according to the impact on the project. This table clarifies what we consider an acceptable resolution timeframe; feel free to appropriate, fill out with your own resolution deadlines and distribute it internally (or in your BEP / BxP) so all teams are on the same page. This attribute can also be renamed “Importance” or “Severity.”
| Priority | Severity | Timeline for resolution |
| Critical | Puts the project at risk | Ideally in 1 day (with meeting if req’d). |
| High | Major impact on the feasibility | Ideally in 1 - 3 days. |
| Medium | Moderate impact | Ideally in 3 - 7 days. |
| Low | Weak impact | Ideally in 7 - 14 days. |
 Due dates are by default set 7 days after the creation of the issue. The default length may be changed in project settings or assigned manually per issue to a given date for a specific deadline.
Where is it?
 Zone is usually set according to the nature of the project in the project settings. Zones will be used for filtering issues and creating detailed reports, so this is the main driver for figuring out how you want to configure zones. NB: The Zone attribute can also be renamed “Area”, “Building”, “Level”, “Location” or “Sector” depending on your issue-naming methodology.
Here are a few examples of how they can be used:
- In a high-rise multi-residential building, the zone would typically be set by level.
- For a large campus project with multiple buildings on the same site, the zones may be set per individual building.
- For an airport project with connected zones, you can split by area in the building, e.g.: terminal gate A, B, C.
- Another option for further precision is to create names like BuildingA-Level1.
 Phase is configured differently based on the scope of work or project phase you are involved with. This attribute can also be renamed “Sequence” or “Stage.”
For example, if you’re a designer and you’re working early in the project then your phases may be schematic design, design documentation, construction documentation, construction, and project handover. If you’re a GC or sub, you may only be involved in pre-construction and construction.
So it might make sense to split the phases by construction sequence. You may also align them by work package to follow up with specific work scope with the sub-trades. You can set up custom phases in the project’s settings.
More helpful details
 Discipline usually represents core disciplines such as architectural, structural, MEP, or sub-disciplines like fire protection, drainage, HVAC, plumbing, steel structure, concrete structure etc. This attribute can also be renamed “Label”, “Trade” or “Work package.”Bear in mind, there is no link to issue access with this attribute. It is used primarily for issue resolution metrics so bear this in mind when setting it up.
March 25th 2019 update: Discipline has a special behavior: it creates a live link between issue and models in BIM Track's web viewer. So when you click "View in Model", all of the models tagged with the disciplines included in the issue will open.
 Group is a bit like a tag. This field is not predefined in BIM Track’s project settings. Usually, our clients are adding the clash test name from Navisworks’ clash detective, or a coordination meeting name / date to create reports for meetings or specific groups of issues.
 Type is a field to provide additional information about the nature of an issue. Issues are not just clashes. They could be RFIs, comments, requests, clashes, of course, questions, data validation, replacement requests, defects, financial matters, errors, or omissions. We have default values that can be changed, or added to, in the project settings. Why is this helpful? Again you can sort your reports and metrics by type, allowing you to focus on the issues you need to.
Premium feature: Custom issue attributes
Many project admins have that one bit of data they wish they could add to each issue.
October 12th 2020 Update: With this premium feature, you can add up to 6 custom issue attributes per project in addition to existing ones.
Like other project settings, you can add more attributes directly in the project settings (which can also be saved in the project template). These can be values input by the user or can be predefined values that users will select from a drop-down, and can have colours assigned like other attributes.
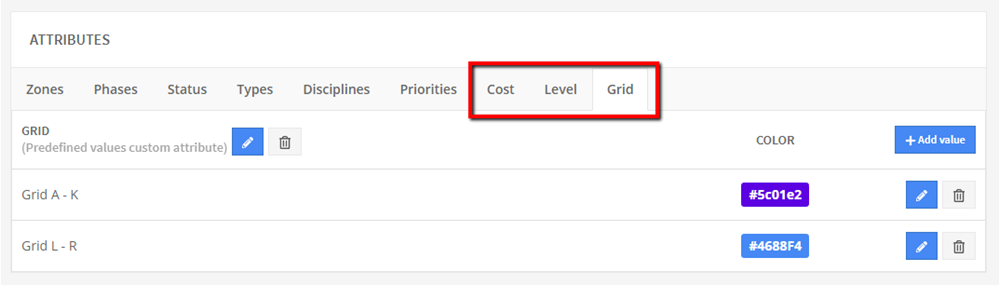
Figure 1.0 Example of where new custom attributes can be defined and modified in BIM Track’s web platform.
Potential uses
These issue attributes can be used in the same way as existing attributes. This new meta data will allow you to sort & filter issues, explore metrics, and generate more detailed reports.
Here are the most popular requests for new types of issue attributes from our wish list:
 Cost: Introducing this custom issue attribute helps quantify the costs associated with having to resolve a change on the construction site. Not only can this feature help set priorities based on potential resolution cost, it can also help prove cost savings from earlier coordination.
Figure 2.0 Add custom attributes to find and quantify change order, cost etc. in your metrics and reports.
 Level & grid: Creating levels and grids or gridlines will allow you to refine your locations even more closely than existing settings like Zones, and combinations thereof for filtering and metrics.
 Root Cause: Track the source of the original issue.
Enough said.
For more on how to set your custom attributes, please refer to our help centre article.
If you’re looking for more help in setting up your project for success, please don’t hesitate to reach out to me.